Day 4, Exercise 2 - ‘Segment Anything’ Model (SAM) for Microscopy#
Lab authors: Esteban A. Miglietta
MicroSAM: ‘Segment Anything’ Model for Microscopy#
Segment Anything for Microscopy (or MicroSAM) is a tool for interactive and automatic annotation for microscopy data. It is built on top of the Segment Anything Model (aka. SAM), a foundational model developed by Meta AI for prompt-based and automatic segmentation of images. The original SAM model was trained on millions of annotated masks from thousands of images (mostly natural images, but some scientific and medical images as well). MicroSAM is a specific implementation of SAM which specializes it for microscopy and other biomedical imaging data.
You can find all the documentation for this tool HERE.
While you can use MicroSAM directly from the command line or as a Python library (there’s even quick start jupyter notebooks that you can run online on Kaggle or Google Colab), we will use the MicroSAM Napari plugin for this workshop.
Learning Objectives#
Learn about SAM and it’s specific implementation for microscopy: MicroSAM
Explore MicroSAM as a tool for aiding in manual annotations in Napari, using the plugin
Explore the limitations of the model
Lab Data#
You can download some sample images from this Drive folder
Installation#
Using Pixi:
Clone the BAB3_environments repo locally (during the course, you should have already done this part!) and cd into that directory, then:
cd microsam #go to the directory containing the pixi files
pixi shell --frozen #activate the new microsam environment (and install, if not already installed)
If succesfull, you should see (microsam) before your command line prompt. Within this Pixi shell, you should have everything you need for this workshop.
You can always exit the Pixi environment using the exit command.
Exercises#
Loading an image and calculating embeddings#
In order to use the MicroSAM models to segment the image, first we need to use the model to compute a simplified representation of the image, aka. an embedding.
Open napari using the command
napariin the command lineLoad a sample image from
File > Open Sample > SegmentAnything for Microscopy. We recommend starting withHeLa 2d example datafor 2D segmentation.
Warning
NOTE Currently, MicroSAM only supports either single channel (grayscale) or 3-channel RGB images. If you want to work with a multichannel image, you will need to convert it to one of these formats before processing with MicroSAM.
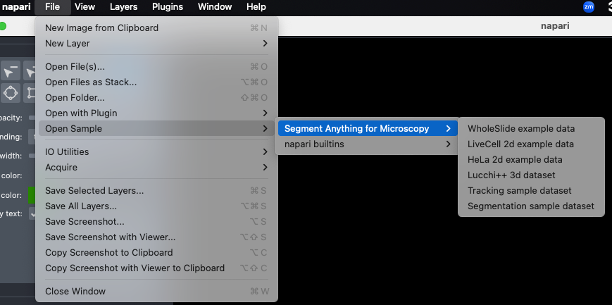
Fig. 45 Sample images menu.#
Go to
Plugins > SegmentAnything for Microscopy > Annotator 2d.In the plugin window, choose the image for which to compute the embeddings in the
Image Layermenu and choose the appropriateModelaccording to the type of images to segment.In the Embedding Settings menu, choose the
model size. (As of writing this excercise, the options aretiny,base, andlarge. We recommend starting withbasebut if your computer is struggling with memory you can trytiny.largewill take even longer to compute so you may want to explore comparing models outside of this excercise.)Specify where to save the embeddings by choosing an
embeddings save path.Run
Compute Embeddingswith the default parameters.
Image annotation in 2D (Documentation and Video tutorial)#
Segment cells using either bounding box prompts or positive/negative point prompts
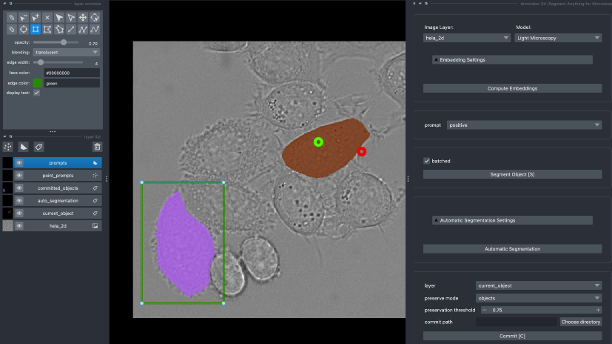
Fig. 46 2D annotation tool using polygons or point prompts.#
You can also try to do an
Automatic Segmentation
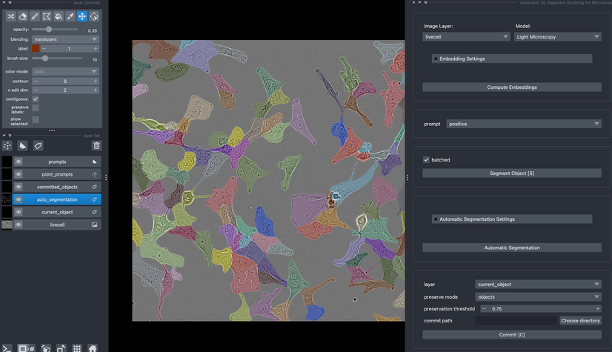
Fig. 47 Automatic segmentation#
Choose a
commit path, where you want to store the segmentation masks that you generate.Remember to
Commityour segmented objects to save them!
Annotate an entire folder: The image Series Annotator (Documentation and Video tutorial)#
Go to
Plugins > SegmentAnything for Microscopy > Image Series Annotator.As before, select the
Modelaccording to the image type, and it’sSize.Select the
Input Folder(thetimelapse_seriesdirectory in the sample data),Output Folder(were the segmentation masks will be saved) andembeddings save path(each one should be a different folder, named accordingly).
Caution
Your input folder should ONLY contain your images and nothing else (like other files or other subfolders), otherwise the plugin will error.
Click
Annotate Imagesand thenCompute Embeddings. This will calculate the embeddings for all the images in the folder so it might take a while.When the embedding computations are done, segment the image the same way you did before and click
Next(or hitN) to move to the next image in the directory and continue annotating.
Image Annotation in 3D (Documentation and Video Tutorial)#
Similar to the the exercise before, but this time use the
Annotator 3d, fromPlugins > Segment Anything for Microscopy
You can try this segmentation tool on the
3d_monolayerimages (start withch2, also try the performance on other channels!). If you want to try EM images, you can open theLucchi++ 3d dataset(in Napari,Files > Open Sample > Segment Anything for Microscopy).Use either bounding boxes or point prompts to segment (
Skey) a few slices across the stack. Then, clickSegment Stackto predict the segmentation in the rest of the intermediate slices. Go through all of them and correct the ones that are wrong using manual prompts.Once you finish, you can
Committhe 3D annotation.
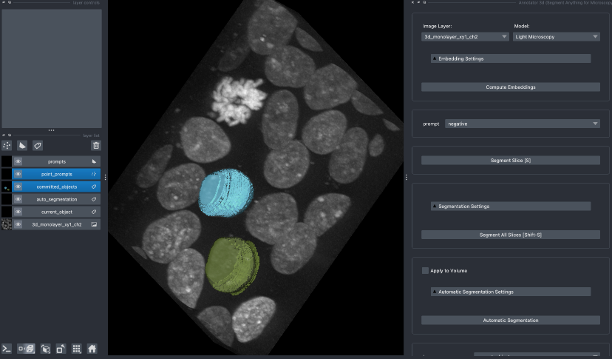
Fig. 48 3D annotation (volume view)#
Bonus Exercise: try SAMJ in Fiji#
SAMJ is an implementation of SAM that can be run in ImageJ/Fiji using a plugin.
Install the SAMJ-IJ for Fiji/ImageJ following the installation guide HERE
Open
Plugins > SAMJ > SAMJ annotatorCheck the instructions for installing models HERE
Load one of the sample images you used before, calculate the embeddings and try to segment it following the manual
Warning
NOTE Currently, SAMj only supports either single channel (grayscale) or 3-channel RGB 2D images. If you want to work with a multichannel image, you will need to convert it to one of these formats and/or extracting individual frames/slices (for 3D/timelapse datasets) before processing.
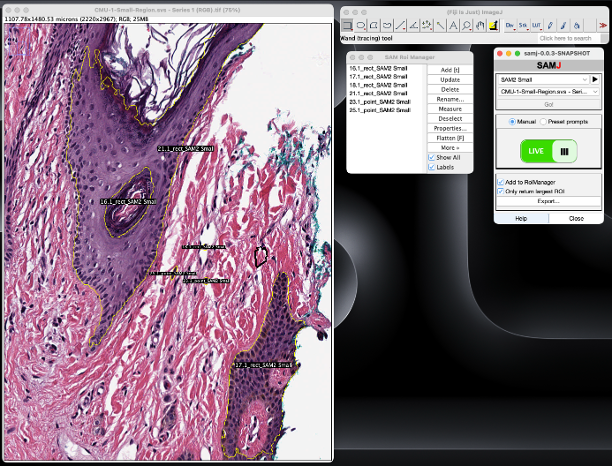
Fig. 49 SAMj annotator in Fiji#