Python Fundamentals
Last updated on 2024-06-24 | Edit this page
Overview
Questions
- What basic data types can I work with in Python?
- How can I create a new variable in Python?
- How do I use a function?
- Can I change the value associated with a variable after I create it?
Objectives
- Assign values to variables.
Open the collaborative doc for our workshop https://broad.io/cb-python-20240624
You’ll find all the links listed below in the collaborative doc. 
If you haven’t completed your workshop setup please visit https://broad.io/cb-python-setup
If you need help with setup, please put the pink post-it on your computer and a TA will come help you.
If you’ve created your colab account, downloaded the workshop data files, uploaded it to your colab account’s google drive AND successfully run the access test, please put the green post-it on your computer to indicate your setup is complete.
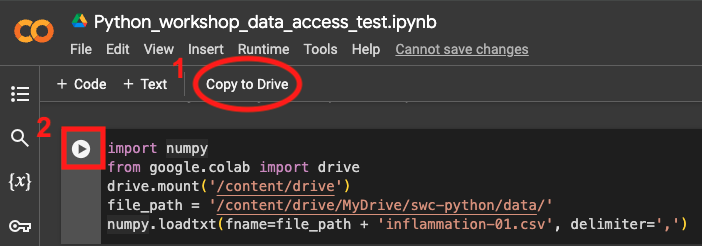
To run the access test, visit https://broad.io/cb-python-access-test, 1. click “Copy
to Drive” and, in YOUR COPY of
Python_workshop_data_access_test.ipynb 2. click the ▶️
symbol on the left hand side of the cell. 
This is what success looks like: 
Feel free to browse today’s lesson content https:/broad.io/cb-python-20240624-lesson 
Google colab
Google colab is a web-based computational notebook hosted in the cloud by Google. Much like a lab notebook where a wet-lab experimentalist might have both the experimental protocol and notes on the specific experiment, a Jupyter notebook allows you to have code and notes in the same notebook.
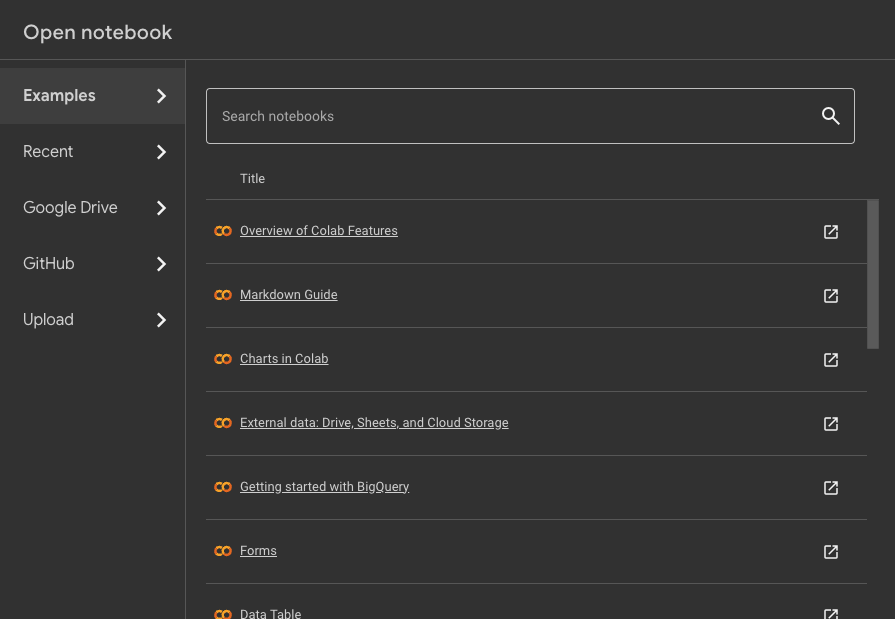
Visit https://colab.research.google.com/ and click on
Examples or, if you’re already in colab,
File -> Open notebook. Then in the resulting window,
click on Examples.
Google offers many example notebooks:

When you first open a colab notebook, it may not be ready to execute
code. Click on Connect (circled in figure) to connect to a
hosted runtime. When you see a green checkmark, you’re all set to run
code in your notebook.

Google offers a basic colab experience for free. Hosted runtime machines consume computing resources which will be shut down if you’re not active in the notebook. If you see an “Are you still there?” window during this workshop, complete the prompt so your colab notebooks stays active.

If you see Connect or Reconnect, you’ve
been disconnected from a hosted runtime and you’ll need to reconnect.
Any work you did in the notebook is likely to be stale and you’ll need
to Runtime -> Run all (Ctrl+F9).
In colab, Macs can use Ctrl+F9 OR ⌘+F9. In other Jupyter notebook environments, Ctrl+F9 may not be an option for Mac. For the rest of this workshop, we’ll use indicate Ctrl+<keystroke> for simplicity. Mac users should keep in mind that using Command (⌘) in lieu of Ctrl is an option.
Notice in the code cell, the word generate is a hyperlink to colab’s new generative AI feature. Because this is a little distracting when you accidentally click on the link, we recommend you disable this feature during the workshop.
Click on the settings ⚙️ icon in the upper right hand corner of your
colab notebook. Select AI Assistance and check “Hide
generative AI features”.
Variables
Any Python interpreter can be used as a calculator:
OUTPUT
23In Jupyter notebook, there are many ways to run a code cell and
insert a new cell.
To do this with one keyboard shortcut, Alt/Option + Enter.
Alternatively, you can Ctrl + Enter to run the currently selected
cell. Then use the Escape key to enter Command mode, then
press B to insert a new cell below the current cell (or
A to insert above the current cell).
Using the graphical interface in colab, you can click the ▶️ symbol
at the left hand side of the cell. Then click the +Code
button.
Doing arithmetic using Python is ok but not very interesting. To do
anything useful with data, we need to assign its value to a
variable. In Python, we can assign a value to a variable, using the equals sign
=. For example, we can track the weight of a patient who
weighs 60 kilograms by assigning the value 60 to a variable
weight_kg:
From now on, whenever we use weight_kg, Python will
substitute the value we assigned to it. In layperson’s terms, a
variable is a name for a value.
In Python, variable names:
- can include letters, digits, and underscores
- cannot start with a digit
- are case sensitive.
This means that, for example:
-
weight0is a valid variable name, whereas0weightis not -
weightandWeightare different variables
Types of data
Python knows various types of data. Three common ones are:
- integer numbers
- floating point numbers, and
- strings.
In the example above, variable weight_kg has an integer
value of 60. If we want to more precisely track the weight
of our patient, we can use a floating point value by executing:
To create a string, we add single or double quotes around some text. To identify and track a patient throughout our study, we can assign each person a unique identifier by storing it in a string:
Using Variables in Python
Once we have data stored with variable names, we can make use of it in calculations. We may want to store our patient’s weight in pounds as well as kilograms:
We might decide to add a prefix to our patient identifier:
Built-in Python functions
To carry out common tasks with data and variables in Python, the
language provides us with several built-in functions. To display information to
the screen, we use the print function:
OUTPUT
132.66
inflam_001
When we want to make use of a function, referred to as calling the
function, we follow its name by parentheses. The parentheses are
important: if you leave them off, the function doesn’t actually run!
Sometimes you will include values or variables inside the parentheses
for the function to use. In the case of print, we use the
parentheses to tell the function what value we want to display. We will
learn more about how functions work and how to create our own in later
episodes.
We can display multiple things at once using only one
print call:
OUTPUT
inflam_001 weight in kilograms: 60.3We can also call a function inside of another function call. For example,
Python has a built-in function called type that tells you a
value’s data type:
OUTPUT
<class 'float'>
<class 'str'>
Moreover, we can do arithmetic with variables right inside the
print function:
OUTPUT
weight in pounds: 132.66The above command, however, did not change the value of
weight_kg:
OUTPUT
60.3To change the value of the weight_kg variable, we have
to assign weight_kg a new value using the
equals = sign:
OUTPUT
weight in kilograms is now: 65.0Variables as Sticky Notes
A variable in Python is analogous to a sticky note with a name written on it: assigning a value to a variable is like putting that sticky note on a particular value.
Using this analogy, we can investigate how assigning a value to one variable does not change values of other, seemingly related, variables. For example, let’s store the subject’s weight in pounds in its own variable:
PYTHON
# There are 2.2 pounds per kilogram
weight_lb = 2.2 * weight_kg
print('weight in kilograms:', weight_kg, 'and in pounds:', weight_lb)
OUTPUT
weight in kilograms: 65.0 and in pounds: 143.0Everything in a line of code following the ‘#’ symbol is a comment that is ignored by Python. Comments allow programmers to leave explanatory notes for other programmers or their future selves.
Similar to above, the expression 2.2 * weight_kg is
evaluated to 143.0, and then this value is assigned to the
variable weight_lb (i.e. the sticky note
weight_lb is placed on 143.0). At this point,
each variable is “stuck” to completely distinct and unrelated
values.
Let’s now change weight_kg:
PYTHON
weight_kg = 100.0
print('weight in kilograms is now:', weight_kg, 'and weight in pounds is still:', weight_lb)
OUTPUT
weight in kilograms is now: 100.0 and weight in pounds is still: 143.0Since weight_lb doesn’t “remember” where its value comes
from, it is not updated when we change weight_kg.
OUTPUT
`mass` holds a value of 47.5, `age` does not exist
`mass` still holds a value of 47.5, `age` holds a value of 122
`mass` now has a value of 95.0, `age`'s value is still 122
`mass` still has a value of 95.0, `age` now holds 102OUTPUT
Hopper GraceKey Points
- Basic data types in Python include integers, strings, and floating-point numbers.
- Use
variable = valueto assign a value to a variable in order to record it in memory. - Variables are created on demand whenever a value is assigned to them.
- Use
print(something)to display the value ofsomething. - Use
# some kind of explanationto add comments to programs. - Built-in functions are always available to use.
