computing_bytes_scratch_repo

![]()


第一次參與開源
萬事起頭難。特別是和其他人合作時,犯錯格外令人不舒服。不過,開源的本質就是和其他人合作。我們希望為初學者帶來一個簡單的方法來學習及參與開源項目。
閱讀文章和觀看教學會有所幫助。不過,有什麼方法能比在不會弄亂任何東西的情況下,實際動手做來得更好?本項目旨在指導初學者及簡化初學者參與開源的方式。記住:過程越輕鬆,學習效益越高。如果妳/你想要做出第一次貢獻,只需按照以下簡單步驟操作即可。跟你保證,這會很好玩 :)
如果你不喜歡使用指令列,這裡有使用圖形界面工具的教學。
如果你的電腦上尚未安裝 git,請按照這個安裝指引(英文)進行安裝。
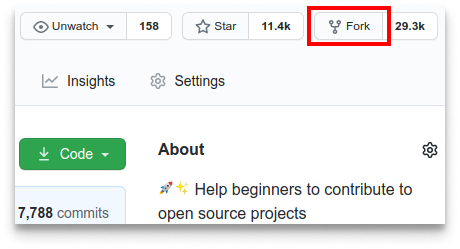
分叉(Fork)本代碼庫
點選圖示中的按鈕來 Fork 這個 Git 儲存庫。 這個操作會將儲存庫分叉到你/妳的 GitHub 帳號下。
複製(Clone)代碼庫
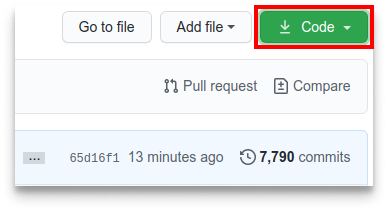
接下來,將複製後的儲存庫複製到你/妳的電腦上。點選圖示中的綠色按鈕,接著點選複製到剪貼簿按鈕(將儲存庫地址複製下來)
隨後打開命令列視窗,鍵入如下 git 命令:
git clone "url you just copied"
“url you just copied”(去掉雙引號)就是複製到妳/你帳戶名下的儲存庫地址。取得這鏈接地址的方法請見上一步。

譬如:
git clone https://github.com/<this-is-you>/first-contributions.git
‘this-is-you’ 指的就是你/妳自己的 GitHub 用戶名。這一步,會將你/妳的 first-contributions 儲存庫複製到你的電腦上。
新建一個分支
下面的命令能在命令行窗口中,把目錄切換到 first-contributions。
cd first-contributions
接下來使用 git switch 命令建立一個程式碼分支:
git switch -c <add-your-name>
譬如:
git switch -c add-david
(新分支的名稱不一定需要有 add。然而,在這個新分支的名稱加入 add 是一件合理的事情,因為這個分支的目的是將妳/你的名字添加到貢獻者列表中。)
對程式碼進行修改,然後提交 (Commit) 修改
使用妳/你喜歡的文字編輯器打開 Contributors.md 這個文件,更新文件內容,將自己的名字加上去,然後存檔。在命令窗口執行 git status,這會列出被更動的文件。接著 git add 這命令則可以添加更動項目到分支裡,就像以下這條命令。
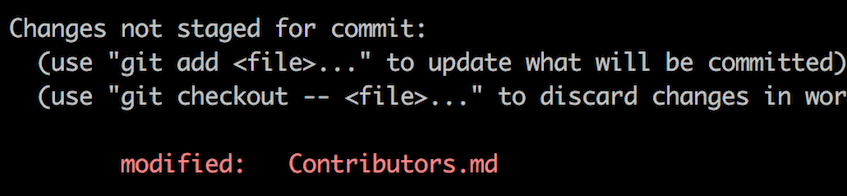
git add Contributors.md
現在就可以使用 git commit 命令 commit(提交)你/妳的修改了。
git commit -m "Add <your-name> to Contributors list"
將 <your-name> 替換為自己的名字
將更動發佈(Push)到 GitHub
使用 git push 命令發佈代碼
git push origin <add-your-name>
將 <add-your-name> 替換為之前新建的分支名稱。
如果在 push(發佈)过程中出 error(錯誤),點擊這裡
- ### Authentication Errorremote: Support for password authentication was removed on August 13, 2021. Please use a personal access token instead. remote: Please see https://github.blog/2020-12-15-token-authentication-requirements-for-git-operations/ for more information. fatal: Authentication failed for 'https://github.com//first-contributions.git/'</pre> 去 [GitHub's tutorial](https://docs.github.com/en/authentication/connecting-to-github-with-ssh/adding-a-new-ssh-key-to-your-github-account) 學習如何生成新的 SSH 密匙以及配置。 </details> ## 提出 Pull Request 將你/妳的修改供他人審閱 前往先前自己 Fork 的 GitHub 儲存庫,會看到一個 `Compare & pull request` 的按鈕,點選該按鈕。 接著再點選 `Create pull request` 按鈕,正式提交 pull request。
不久之後,如果妳/你更改的文件與原本沒有衝突,我們會把所有的變化合併到這個項目的主分支。 變更合併後,妳/你會收到通知 email。 ## 接下來做什麼呢? 在[這個網站](https://firstcontributions.github.io/#social-share)慶祝妳/你的成就並跟朋友及追隨者分享。 如果有任何疑問或想獲得更多協助,歡迎加入我們的 [Slack](https://join.slack.com/t/firstcontributors/shared_invite/zt-1hg51qkgm-Xc7HxhsiPYNN3ofX2_I8FA) 現在就動手為其他專案貢獻你/妳的心力。我們整理了一個清單,裡面的專案都有簡單的議題可以著手。[去看看吧!](https://firstcontributions.github.io/#project-list) ### [ 更多資料 ](/computing_bytes_scratch_repo/additional-material/git_workflow_scenarios/additional-material.html) ## 使用其他工具的教學 |
|
|
|
|
|
| | --- | --- | --- | --- | --- | --- | | [GitHub Desktop](/computing_bytes_scratch_repo/gui-tool-tutorials/github-desktop-tutorial.html) | [Visual Studio 2017](/computing_bytes_scratch_repo/gui-tool-tutorials/github-windows-vs2017-tutorial.html) | [GitKraken](/computing_bytes_scratch_repo/gui-tool-tutorials/gitkraken-tutorial.html) | [Visual Studio Code](/computing_bytes_scratch_repo/gui-tool-tutorials/github-windows-vs-code-tutorial.html) | [Atlassian Sourcetree](/computing_bytes_scratch_repo/gui-tool-tutorials/sourcetree-macos-tutorial.html) | [IntelliJ IDEA](/computing_bytes_scratch_repo/gui-tool-tutorials/github-windows-intellij-tutorial.html) |
項目支持者:
